Archive for the 'Climbing' Category
Background
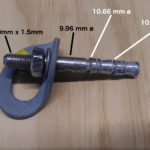
A report from a Vermont climber about issues on the route War on Drugs at the 82 crag prompted inspection of the route’s fixed protection. While dealing with a separate set of problems, the last bolt identified as needing replacement was a 10mm Raumer double wedge bolt. These bolts were thought to be bomber in Northern Vermont schist along with their Fixe counterparts. What was troubling was the way in which the bolt was removed, or more accurately the ease with which it was removed. The manner and ease of removal indicated that the expansion mechanism of the bolt was in no way actually engaging or functioning. It is very troubling for a wedge bolt to be exhibiting behavior like this. Wedge bolts are often thought of as “fool” proof in that once they are installed in the hole, any attempt to remove them or load them will further engage the mechanical expansion effect keeping the bolt in the hole. The exception to this is in soft rock which typically does not allow for proper engagement of the expansion sleeves to achieve proper expansion.

Raumer double wedge; vintage early 2000s
Failure mode
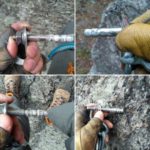
These bolts can be quickly identified with a torque wrench. Attempting to tighten the bolt and hit the target torque value will yield a nut that turns endlessly until the nut bottoms out on the threads of the stud. The corollary to this statement is that tightening the nut is backing the bolt out of the hole! Once the threads are bottomed out is it a simple matter to lightly funk the bolt out with a cable and hammer or sometimes even remove it by hand if the beginning of the hole is sloppy. Similarly one can remove the bolt simply by adding a spacer to allow the nut to be repositioned to allow for additional displacement of the bolt body. The below video shows the state after the threads have been bottomed out and how easily the bolt is removed.
Additionally, the below composite photo of four different Raumer single and double wedge bolts shows the state of the expansion sleeves once the bolt have been removed from the hole. As well, the high-resolution photo on the right taken at home also lends credence to this point. Note that the expansion sleeve shows little evidence of having ever expanded in all of the photos.
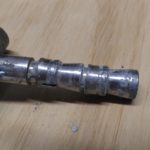
After conferring with Greg Barnes at the ASCA and discussing the video, photos, and taking measurements of the hole and bolt, the evidence suggests that the expansion sleeve is never “grabbing” the sides of the hole and allowing the rest of the bolt to pass-through ,engaging the tapered cone into the sleeve. The thought process here is that rock is too soft and/or the expansion sleeve is too burly and requires too much force/friction than is present to properly engage. Instead the minimal compression fit of the oversized expansion sleeve is the only resistance met. It is likely that with a regular spanner wrench, the friction of the compression fit is mistaken for proper engagement and tightening of the bolt. However, with a torque wrench it is readily apparent that the bolt is not properly tightening.
This theory is consistent with other observed performance shortcomings of this model of bolt in soft rock [1] as well as the input of a prominent fixed anchor manufacturer.
The seemingly random distribution of failures is likely attributable to the highly variable quality of green schist, wherein a vein of softer rock is often encountered which is likely promoting this behavior. This would be consistent with previously observed and understood failings of wedge bolts in soft rock. This is also likely the reason double wedge bolt models have had the best track record in schist as these bolts are designed for specific types of concrete where it is likely to have large pebbles in the concrete that may be shattered by drilling leaving a void. The theory behind this bolt’s design is that two expansion points provide an assurance that one of the expansion sleeves will engage in the matrix of the concrete. For schist, substitute a muscovite vein for a shattered pebble and we likely have a similar situation in many of our cliffs.
Impact
As of this analysis, an inspection has been performed on approximately 95 bolts on 13 different routes, installed by three different developers on three different cliffs. Of these 95 inspected bolts, 22 have shown to be non-functional.
The failure rate of this sample pool breaks down to 23%.
Given the consistency of the condition of the bolt and the manner in which it is removed as well as the spatial distribution of occurrences, it is hard to argue that this trend would not apply to all installations of these bolts in Northern Vermont schist.
The list of routes inspected and number of bolts removed are provided below.
| Route name | Failed bolts |
|---|---|
| Doggfather | 1 |
| War on Drugs | 1 |
| Politics of Dancing | 2 |
| Crimp Chimp | 4 |
| Year of the Dog | 3 |
| Quills | 1 |
| Arms Reduction | 4 |
| Truffle Hog | 1 |
| Pussy Galore | 1 |
| Wandering the Halls | 1 |
| Playground Bully | 1 |
| Anything for an A | 2 |
The Fixe bolts are likely unaffected by this particular problem as their expansion sleeve is significantly thinner and likely requires less “oomph” to engage. This is supported by tests of these bolts at 82 which showed all the protection bolts on Quills and Kid Charlemagne hitting specified torque easily. More confirmation is needed in order to dismiss this possibility however.
Proposed Action
Given the random distribution, likely the only way to identify these non-functional bolts is to “take off and nuke the entire site from orbit”, which is to say that each and every bolt should be torque tested to ensure proper function. Therefore it’ll be necessary to try and inventory all the routes that do or likely do have these bolts installed. Applying the roughly 25% failure rate to the total number of bolts will provide a ball park number of replacement bolts to ensure are available in order to effect the replacement of non-functional bolts as identified.
References
A couple weeks ago Janika and I spent a day out at Prospect Rock near Johnson. It’s a great location for a mellow day or for aspiring leaders with a good deal of easy and moderate lines. The major downside is that part of the Long Trail goes to the top of the cliff line and many a d-bag has tossed just about any type of garbage you can imagine off the top of the cliff. Sadly, the base of the cliff is littered with debris the most serious of which is broken glass. Thankfully, the worse area for junk only has a few routes.
Aside from that one downside this cliff would most likely be very popular if it were closer to Burlington and a more significant climbing population. One of the best lines at the cliff is a 5.7+ bolted face called Charge the Farm! put up by Kristian Barrowman and June Mendell. It’s a nice sustained face climb on featured schist. While rappelling from the anchor we both noticed enough features to put a plumb line in under the anchor.
After a little research on whether this had been reported as having been explored, we returned the next weekend with the pig fully loaded if we found something worth while. We ended up discovering a pretty enjoyable mixed route that didn’t requir much cleaning to make it climbable. The first half climbs off-vertical face passing through a couple overlaps (bolt protected). From there it is possible to string together natural protection in an incipient crack system, including a devious #2 Camalot slot. This gear-protected line wanders a bit to the right coming close to Charge the Farm! but since it went on gear, I didn’t feel there was any issue. TCUs (probably blue and red) or tri-cams would be very helpful, but a packing fail in the morning left us without either. Instead we had some less than ideal shallow/asymmetrically deployed four-lobed cam placements. The last move has a bit of a sting as the gear is a bit below your feet and foot work becomes key.
We had climbed a more plumb line but we didn’t have enough bolts with us to protect that part (shipping mess-up with a shop in CO). So we wanted to establish this line and then take the time to think about whether to bolt the direct finish. I genuinely think the route is a good contribution to this section of the cliff. While not as good as its neighbor, I think it’s a two out of three star route, especially once it is cleaned some more. Fact is spicy routes probably don’t get climbed as much…especially by budding climbers. After a lot of thought, I figured it was best to add the direct line and add a couple more bolts to take the majority of the sting out of the fall potentials. The line is still technically mixed, taking a finger sized stopper and a blue or yellow tcu (neither would be really ideal to go without if 5.7+ is near your limit) and sporting 7 bolts.
Buy the Farm – 5.7+ 80′
Start about 15 feet down and left of Charge the Farm! at a slabby face that leads to an left-leaning overlap and left-facing corner. Face climb through a couple of overlaps until the 5th bolt. Trend up and right past a stopper placement and some dirtier rock to a small ledge with a bolt and a small overlap above. Pass the overlap (many options) ultimately aiming for a finger crack slot above the right side of the overlap (TCUs/tri-cams helpful). A final bolt protects a thought provoking exit to the shared anchor with Charge the Farm!.
Hiding in the hills of Eastern Kentucky lies the Red River Gorge, home to one of the world’s first-class climbing destinations. Sport climbers from around the world come to test themselves on the infamous overhanging sandstone cliffs that define Kentucky climbing. In fact some of the hardest climbing in the country is still going on there.
Many have come to refer to the Red River Gorge as simply “The Red”. I really don’t like this name and try to use the full name at all times, but for the sake of brevity I will sell out my values.
Climbing in the Red is a nice logistical change from climbing in the Adirondacks. The overhanging nature of the rock means that many of the climbing areas are completely sheltered from the rain, meaning you can climb even in a downpour. As conditions would have it, this was something that we took advantage of on a couple of rainy days. Additionally, many of the approaches are very short, as in 5-15 mins short. After a season of a lot of backcountry climbing last year, I was used to hiking miles to get to a cliff, so this “roadside” climbing was a welcome change of pace.
Since the Red is a world-famous climbing location, the area has grown to somewhat embrace and cater to the climbers. The local climbing scene centers around Miguel’s Pizza, an eclectic mix of campground, pizza restaurant, climbing shop, and hangout. Miguel has staked his claim as the preferred hangout of climbers by offering fields for tents ($2/person/night), a coin-operated bathhouse and laundry, and delicious food. The only thing missing from the equation is the universal constant of beer. Interestingly, the Red River Gorge is comprised of a jigsaw puzzle of counties, many of which are dry. As Miguel’s is in a dry county they stock a strategic reserve of the local favorite soft drink Ale 8₁, known as an “Ale 8” or “A late one”. My personal after climbing treat at Miguel’s is a 4-slice pizza (you can order 2,4, or full 8 slice pizzas) topped with chicken, spinach, green peppers or pesto and a couple Ale 8s.
On my previous trips I have stayed in either a cabin or a hotel (when you know someone with a plane your life changes). On this trip we were looking to go as cheap as possible but we wanted to avoid the chaos that is the Miguel’s camping environment. One of my climbing partners had spoken many good words about the Lago Linda Hideaway. So we chose to follow the praise and stay there. At $5/night/person with included water, covered cooking areas with a kitchen sink, showers, wireless internet, and a peaceful, secluded setting it is jokingly referred to as the “climber’s retirement campground”. In other words, for a campground it is palatial. I was really impressed with the facilities and the sense of shared responsibility from the patrons to keep the place in good order. I would emphatically recommend Lago Linda to friends and will stay there exclusively whenever I am climbing in the Red River Gorge.
“Grrrrrrrit, Grrrrrrrrit, Grrrrrrrrit”, I pause for a second and consider how odd it seems to be sitting on the floor in my gear room wearing shorts, with the ceiling fan on, sharpening my front points and the pick of my ice axe. Usually this is an activity reserved for the months between Dec and March. Yet, it’s August right now. I remind myself that the next couple weeks are going to be filled with things I’m not necessarily used to and finish sharpening things.
Packing is a necessary evil. It’s both enjoyable and downright miserable…sometimes at the same time.
What I’ve learned over the past couple of years though, is that packing is a learned art. The more I pack for trips, the better I get, the quicker it goes, and the less painful it becomes. It seems almost as if I am developing a template packing list that gets refined for the trip’s objectives, climate, and the season. Desert climbing in the fall? The essentials become down hoody for the mornings, the 20 deg. sleeping bag, and lots of athletic tape to protect your hands from jamming. Sport climbing in the Southeast in the spring? Sunscreen, cut-off t-shirt, and shorts. Wait, maybe I should start writing this down and start a business as a packing consultant for adventure travelers…

About 3/4 of *my* gear for two weeks in Wyoming
Regardless, the process of preparing for a trip is all encompassing. Packing everything you need to live self-sufficiently for a few weeks ends up being a lot of stuff, even when you cut it down to the bare essentials. Inevitably you always forget things or remember things at the last minute. The day of departure is always a roller coaster ride of “oh shit, I almost forgot that” and “damn it! I forgot…” after you’re a couple hours into the travelling. For better or for worse, this is all part of the experience.
While so many aspects of packing and travelling are bitter-sweet, there is one truism. The worst thing you can do to a trip to complicate the packing and travel process is involve air travel. For the modern climber (or adventure traveller in general), nothing quite complicates the packing process like modern airline baggage policies. The packing process becomes a delicate ballet of dividing all the necessary pieces of gear between all the travellers and then splitting it up amongst the carry-on (usually the climbing pack) and a checked bag. As a climber it seems it’s always a super close call as to whether you will make it under the 50 pound bag limit.
Even with the added frustration of air travel, once you make it to your destination and manage to touch some real rock or get the first views of mountains, all the stress and frustration melts away and it all feels worth it. If you’re lucky you avoid any complications travelling (less likely if you’re unfortunate enough to have to fly) and maybe you’ll even figure out how to refine your packing system a little bit too. Inevitably, your time in the mountains will go by too quickly and you’ll find yourself packing once again, but this time with a lot less energy or aim. Although, you’ll probably be considering how you’ll pack differently for the next trip.
It’s no secret that I want to start learning how to bring my experiences and stories of climbing to light through the use of various multimedia formats. I’ve started playing with audio narratives through the podcasts. I’m working on learning more about digital photography by taking a course this semester. In my spare time, I think I’m going to start messing around with video. Specifically, documenting “a day” of climbing that highlights some aspect of climbing that I want to share. So, bear with me…this will be rough. Today’s post and “In a day” segment will be about failure and the lessons learned through it.
I used to be afraid of committing remote climbs. There are too many unknown factors you can use to psyche yourself out. Remote climbs, particularly ice climbs, require a keen understanding of a lot of factors and how they come together to affect your experience. When rock climbing these factors are mainly limited to precipitation and sunshine/wind to determine whether a climb is dry or not. Ice climbs though…they’re a different story; there are so many factors that can impact your experience. Cliff aspect, how a climb is fed (how the ice grows; snow melt, seeping water, etc.), weather data, snow stability, these are just some of the many pieces of information that go into affecting the state of an ice climb and your experience.
These types of climbs, the experience of trying to climb them, it’s all a perfect metaphor for life. There is a beginning, a definitive end, and in between, you have a nebulous cloud of experiences. Fear, joy, bravery, frustration, the list continues; all the human emotions are there. Some times they’re even all chained together in the same pitch of climbing. It’s probably this reason why I have begun to like these types of climbs lately. I’m at a point in my life where I’m trying to figure a lot of things out about myself and what I want to do with my life. These climbs; the experience of attempting to climb them, it resonates with me and my daily struggles in life. I’m able to internalize the metaphor and digest it and come back with just a little bit more clarity into my own life.
Remote climbs demand more of you. You have to have a serious dialogue with yourself at moments. There are some times when you need to be 100% honest about your abilities, comfort zones, and goals. At these moments miscalculating can have serious consequences to you and your partner. In a way, this is no different than every day life. We all have to make difficult decisions that require us to calculate and weigh many factors. The only difference is that unless under extraordinary circumstances, we generally don’t have to worry about injury to life and limb from the choices we face in every day life.
If we’re lucky, we calculate correctly and things work out. If we’re less lucky, we calculate incorrectly and are unsuccessful but unscathed. If we’re just unlucky…well…unscathed probably doesn’t apply, but at least we probably have a good story to tell. Today, I’d like to share with you a video segment about decisions, miscalculations, and failure (fortunately unscathed). The subject matter is a climb that my best friend Matt and I have been trying to climb this season, called The Pearl. A 140-170m WI4-4+ climb that ascends the left side of the SW face of Azure Mtn.
WARNING: The audio on this gets R rated at times, we curse to express our frustration. Don’t blast the audio if some f-bombs won’t go over well.
In a day: Failure from Greg Kuchyt on Vimeo.
We return to a podcast format for this post. I couldn’t sleep this morning, so, here’s what happens.
I originally wrote this in August, but I sat on it for a long time. I felt like it wasn’t a good story, not worth sharing. I blew the dust off of it a few days ago and showed it to a couple friends who encouraged me to do it up, so here it is. It’s not as good as I would like, but for an hour’s work of “producing” it’ll do.
As a post-script of sorts. I went on to finish the season out strong. Still afraid to fall, but able to manage the fear of it. I on-sighted a few 10as, a 10b, and had a one-hang rest on a 10c on a 40° day so I could warm my hands up. Progress.
Today’s music is from Janelle Monae’s new album The Arch Android and it’s the track Tightrope (ft. Big Boi).

Greg on the tyrolean over the Ausable River
Matt and I finally committed to heading out to Moss Cliff yesterday. It’s been on our radar for a year or so but the guidebook makes it clear that Moss Cliff is a big boy playground with the following description; “If you can lead 5.9-5.10 cracks, then Moss Cliff holds some of the best long crack climbing in the region, although there are no easy routes.” The prospect of heading to Moss Cliff was enough to cause more than just a little anxiety. However, after a strong weekend of climbing in the Gunks last weekend I was feeling confident.
We got to the parking area and headed for the tyrolean that crosses the river. Whoever setup that tyrolean used dynamic rope, the same stretchy rope we use in climbing to absorb the force of a fall, so it sags a lot. By the time you’re in the middle of the line, you’re almost in the water especially with the added weight of a pack full of gear. Once you cross the river, the adventure has only begun. The approach to the cliff is a bit of a sleeper. It’s only maybe 30 minutes, but it’s uphill the entire way and puts your calves to work. Thoroughly sweaty, we hit the base of the cliff and headed for Hard Times (5.9+), “a true Adirondack testpiece at the grade” as Lawyer and Hass write in the guidebook.

Matt in the pitch 3 chimney of Hard Times (5.9+)
The crux pitch of Hard Times begins with a chimney and then transitions out into a right-facing corner with an overhanging bulge (the crux) that then kicks back to off-vertical polished face/crack climbing that leads to a 7″ off-width. You can split the crux pitch into two sections by working left at the top of the chimney to a bolted anchor on a nice ledge for another route (Spirit of Adventure). We chose to do this, based on my relative inexperience in chimneys and that Matt had followed this climbing a month before and did not in anyway want to have to lead the crux. So Matt led the chimney and then I tackled the crux and “scary” climbing above the crux.
You have to traverse out right back into Hard Times from this interim anchor which is a little heady, but not exceedingly difficult (you can see the ledge in the picture and the overhanging bulge to the right). The crux of Hard Times is intimidating, but the gear is all there and you can spot all the moves before you attempt it. The polished face that follows the crux is a different story. You have to make committing moves above small gear (micro cams/small stoppers) on polished features with a lot of your weight on your feet. It’s definitely the psychological crux in my mind. After I got through that I took a long time to figure out how to climb the short off-width section of the climb, but finally got it and proceed to link together the second half of the third pitch and the final fourth pitch.

Greg follows on the last pitch of the day as twilight begins to settle
It took us a long time to do Hard Times, but it’s really hard climbing so it’s a little more reasonable to take 4.5 hours to do 4 pitches. Pleased with our success we decided to also do A Touch of Class and we would attempt to get the whole climb done in the quickly fading sunlight. We started around 4 or 4:30 and got through the climb in about 2.5 hours (three pitches) so we definitely sped up on this climb, but the climbing was less challenging than what we had previously done (still hard though).
We ended up running into Matt McCormick and Jean-Pierre Ouellet (aka Peewee) at the cliff and on the way out helped them setup a better tyrolean system, so there is now a much tighter piece of static line (much less stretch) in place. McCormick recently went on a blitz in the Adirondacks with 5.13c R and 5.12c PG first ascents to his name. Peewee has specialized in becoming one of the world’s best crack climbers with an impressive list of ascents of some of the world’s hardest cracks. It’s pretty unreal to hear these guys talk about the potential for new routes at the cliff; referring to 5.11 terrain as “easy”. It was cool to see that they were very real and down to earth people though. Which reminds you that in the end climbing is a pretty similar experience for everyone, whether you’re climbing moderate classics or elite testpieces.
All in all we had a solid day. Six of the seven pitches were 5.9 or 5.9+ and some of the climbing was straight up hard and sometimes mentally demanding. It really felt like the day was the culmination like all the hard work and training I’ve done this year. It’ll definitely be a highlight of this season.

Matt following pitch 3 of Quadrophenia (5.7+)
Presented with a stellar forecast for Friday and Saturday and a crap forecast for Sunday, Matt and I did what any self-respecting climber would do, we blew off work and headed for the rock! Friday we headed down into Keene and went up to the Hurricane Crag. We hadn’t been there in about a year, so we were interested in looking around and seeing all was around up there. We did the standard 5-star must-do moderate Quadrophenia (5.7+). We linked Pitches 2 & 3 to avoid the uncomfortable belay stance under the pitch 3 roofs (highly recommended to do so). After looking around at some lines that ascend up in the area of the rappel line, we were struggling with motivation. It seems like a lot of the routes in the Hurricane Crag that are in our range (5.10a or easier) are either dirty and not highly recommended or have PG/R gear ratings and closer to our limit (5.9/5.8). There is however, a 4-star 5.10b with solid gear there called Forever Wild. The 10b crux is a fist crack in a pretty much dead vertical section of the wall. From what I had researched about it on Mountain Project, it was supposed to be a pretty sustained 10b though. Just one look at the climb and I could tell it was going to be pretty consistently hard.
We hemmed and hawed about what to do and finally I decided to sack up and attempt to lead it. I loaded up a double rack from fingers to fists (#3 Camalot is essentially fists for me) and set off. Unfortunately the 4-star climbing is marred by a 0-star start. You have to ascend a steep, vegetated dirt cone for about 30′ with no real protection to gain the start of the crack system. Once you’re in the crack, you’re presented with a dead vertical, tight off-finger crack (consistent #.5 C4 cam size) for about 20 feet. I’m not going to lie, this was fucking hard for me. I couldn’t get any finger locks/jams and it was too small to get finger stacks to work either. As well the left side of the crack stuck out from the right side so you had a weird edge on the crack, making it tempting to try and lie-back it, which was strenuous and made protecting the climb that much harder. I ended up aiding through this part to gain a consistent finger crack section tucked into the back of a shallow alcove. I must admit I also aided this as I wasn’t really excited to take a fall around the alcove. At the top of the alcove, you gain a horizontal that splits the finger crack from a dead-vertical to slightly over-hanging hands/tight hands crack above it which goes for about 10′ to gain another horizontal. I managed to free this section of the climb after some strenuous jamming & foot work. At the second horizontal it’s possible to step left and do a 5.9 finish variation. I highly do not recommend this variation. It involves little gear, a make-out session with a cedar tree (I have scratches all over my back and shoulder), and dirty, rotten lichen covered rock. After I brought Matt up, I had him lower me and I did a quick TR run on the entire climb. I made it to the crux (actually taking the right-ward traverse at the second horizontal to the 10b crux fist crack. I fell twice on TR at the crux trying to figure out the sequence. The sequence I found involves strenuous cupped hands/tight fists and a toe hook/jam and basically going horizontal to be able to finally jam my fists up high to pull up onto my feet. It’s wicked strenuous for 1 or 2 moves, but it works. I’m not sure if there is a better way on this or not, I’ll have to revisit it sometime. The good news is you get a bomber #3 cam placement right at the crux and it’s dead vertical with a clean fall below. I think knowing the gear down low would allow me to lieback the opening section and punch through that strenuous part, the rest of the climb I think would come together pretty well. We’ll see, a project for the fall time.

Matt leading the third pitch of Pete's Farewell (5.7)
After our “project” session (3 hours later), we headed out and did a quick run up Pete’s Farewell (5.7) at the Pitchoff Chimney Cliff in Cascade Pass. Matt got pitches 1 & 3 (the ones I got the last time we did it a few months ago) so I decided to do the climb in my approach shoes. I was pretty confident I could handle the second pitch in them. I managed, though it made a couple moves a little more interesting. After we got back down to the car we headed into town and grabbed some dinner and then headed to the Meadows to quickly setup our tent and get some shut-eye.
In the morning, we slept in and had a slow start to the day. The weather was pretty overcast and it was chilly in the morning, so that didn’t motivate me much to move fast, on top of the little sleep I managed to get. We decided on going to Poke-O to give Psychosis a shot. The guidebook notes Psychosis as one of the two most-feared 5.9s at Poke-O (a pretty bold statement). We had heard some guys talking it up a few weeks ago, and saying how they took a big whipper at the crux. I’m not going to lie, a bit of the appeal was to go and get on it to see how hard it really was, as these guys were a lot of talk and I was pretty confident I’m a much better climber than either of them. Well, I can say that it is a really hard f-ing pitch. The pitch is basically a 40-foot leaning lieback that is wicked strenuous to climb and protect. I managed to get within 5 feet of the end of the hard stuff and was just super pumped. I didn’t want to push it and miss and end up falling weird (falling while in a lieback always sketches me out that I’m going to catch my feet on a sling and flip). I decided to move a couple moves down and push off from the wall to make sure I took a nice clean fall. I took a short little 6 foot fall and shook out and climbed back to my last piece and chalked up and then fired the last remaining section. I’m kind of frustrated because I should have just pushed that last 5 feet because I’m pretty sure I could have made it, but I made the safer decision and at least I didn’t take a huge ride on the climb. Matt took the next pitch which was a pretty stout 5.7 with a pretty intimidating crux (strenuous undercling lieback on a slab). I got the next pitch which was a 5.8 traverse in the dyke rock. This was another intimidating pitch. The guide book says the crux is a traverse around a blunt arete into a shallow corner, but I don’t agree. I found the crux to be a thin face traverse before all that. You have minimal gear for it, and you’re not high above the slabs below and could pendulum down on to the slabs if you blew the moves (which are thin and committing, though you have pretty solid feet). The “crux” isn’t well protected either and involves some tricky sequency foot work in order to get through. I had to climb through it and then back to a rest stance a few times before I sussed it out and could commit to it. After that it was a traverse up onto a vegetated ledge; a straight-up jungle expedition through dense vegetation (at points I couldn’t see where I was putting my feet). I ended up blowing past the belay, but fortunately found a much nicer belay 15 feet to the right that unfortunately forced us to have our ropes in the firing line of menacingly loose blocks and flakes in the dyke rock.

Greg investigates the psychological traverse "crux" on the third pitch of Psychosis (5.9)
Matt commenced with the final pitch (5.6 PG) and expertly set up a few directionals to keep the ropes away from the loose shit and then proceeded to lead us to the top. Up until the second half of the 3rd pitch, we thought the climbing was really pretty good and couldn’t understand why the route was only 2-stars. The second half of the 3rd pitch and the 4th pitch are why. The fourth pitch is exceedingly dirty and the gear is kind of shitty around the crux, which is just kind of weird. It’s very easy, but just an awkward committing move with a bad fall potential. After that you ascend like 50 feet of “slab” which is apparently guide book code for grass, dirt, and dead tree branches. It really kind of sucked. After finishing the route we proceeded to continue to try to find the Discord rappel line, which we couldn’t find. We found a tree at the cliff’s edge with a seriously worn piece of cord and a single quicklink. We backed it up with another piece of cord and a rap ring and set off to find ourselves rappeling down over the Roof of All Evil (A3+). After a cluster fuck of a rappel situation, we managed to make it to the ground somewhat demoralized but still pleased with our getting on a new “obscure” route.
We talked with a local later in the day and he summed things up nicely with the response “That doesn’t get done much…” to our answer to his question “What did you guys just get down from?”. He confirmed our opinions that the crux pitch is really freaking hard and that the traverse pitch is pretty ballsy, and that the other sections are in fact, pretty damn dirty. It felt nice to have some validation as to why we felt so worked. We spent the rest of the day looking around, trying to get on climbs we wanted to do, but ended up walking back to the Discord area and getting on Group Therapy and then looking around the Luther Wall area before it started to rain and we decided to call it quits.
Overall, a good weekend. We got some new projects (Forever Wild, clean run up P1 of Psychosis, found some new climbs to add to our projects (Phase III, Son of a Mother, Discord, Slime Line, & more), and learned how to climb in the real world (aiding, protecting ropes and seconds in loose terrain, etc). We also stayed true to the three rules by coming back safe, as friends, and having had fun. You can’t ask for much more.
I’ve been slacking on a lot of stuff lately. I’ve got a podcast in the process of being written, and an essay mostly written with some thoughts on training. I’ve just been really tired lately. I’ve been climbing hard lately and really pushing on the training side of things as well. In the past week, I completed a couple bouldering projects, pushed my limits on trad leading, took some falls, and generally have been going at the edge of what I can put out.
I think I’ve been over-reaching/over-training here. In retrospect I’m exhibiting a lot of the symptoms; exhaustion, lack of motivation, suppressed appetite, trouble sleeping, etc. It occurred to me that over-reaching/over-training is a negative feedback loop. You feel like you’re not performing at your best, which forces you to try to push harder or train more, which just puts you deeper in the hole, which pushes the psychological need to train, ad nauseam. For me, I think one big indicator that I need to scale back is when I just don’t even feel like heading to the gym/boulders/etc to train. For me training is an integral part of my daily existence; my release. When I don’t feel like doing it, it should be a pretty powerful flag to stop and look at things. More often then not, I’m concerned I’m just having a weak mental moment, and I’ll push myself to hit the trail, work a project, or grind through a workout solely to push through a mental barrier. Maybe I need to take more time and look back at the training log and consider whether I’m just being lazy or if I really do need to take a seat for the day. I guess this is what they mean when they say only a fool has himself as a trainer.

The initial stages of packing
Behind every big climbing trip lies tens, no hundreds, of hours of planning; The whole process of choosing a location, choosing a time, planning an agenda, packing, etc. is enough for a climbing team to obsess over for months. Add a couple guide books to the equation…and well…you’re adding fuel to the fire. Receiving a guide book for the climbing area you’re looking to visit is kind of like…Christmas. It’s new, shiny, and you’re super excited when you crack it open for the first time; asking yourself what amazing experiences will this guidebook lead to?
The simple process of thumbing through the guidebook is an experience all unto itself. Like a child peering at the latest and greatest toy, a climber rifles through a guidebook looking for the most classic lines. Looking at topos and photos you wonder how close are the ratings to what you’re used to? Are the ratings in this area going to be hopelessly sand-bagged or delightfully soft?
The unfortunate downside to planning a trip…is planning a trip. Dealing with the logistics of a climbing trip can sometimes be downright disheartening. With more and more people heading to the outdoors it is becoming increasingly necessary for land management agencies to set tighter and tighter regulations on climbing areas, requiring climbing permits or campground reservations. Add on the tasks of finding the cheapest airfare and figuring out travel logistics (rental car, airline baggage policies, etc.) and the excitement of a climbing trip can quickly be eclipsed by the red-tape.
My personal least favorite task is packing, especially when an airline is involved. Airline baggage rules are not climber friendly. Climbing generally involves a lot of gear, so a 50# limit and a 62 linear inch bag size makes for a tight fit for even a short climbing trip. That is, unless you don’t care about paying extra fees for additional bags or overweight/over-sized bags. Can you believe that the over-sized bag fee on a lot of carriers is $100!?!? Regardless of how frustrated you get though, all the animosity melts away the last few days before your trip. Suddenly you’re back to the Christmas time feeling, unable to sleep at night, thinking about the trip. That’s where we are now, so thankfully we are leaving tomorrow, so we can finally stop wondering and start doing.